


How to Validate Pre-Production Environments
Validating your pre-production environment is essential for smooth deployments and avoiding costly production failures. Here’s the core takeaway: your pre-production setup should closely replicate production to catch issues early. This includes hardware, software, network configurations, and testing processes.
Key Steps for Validation:
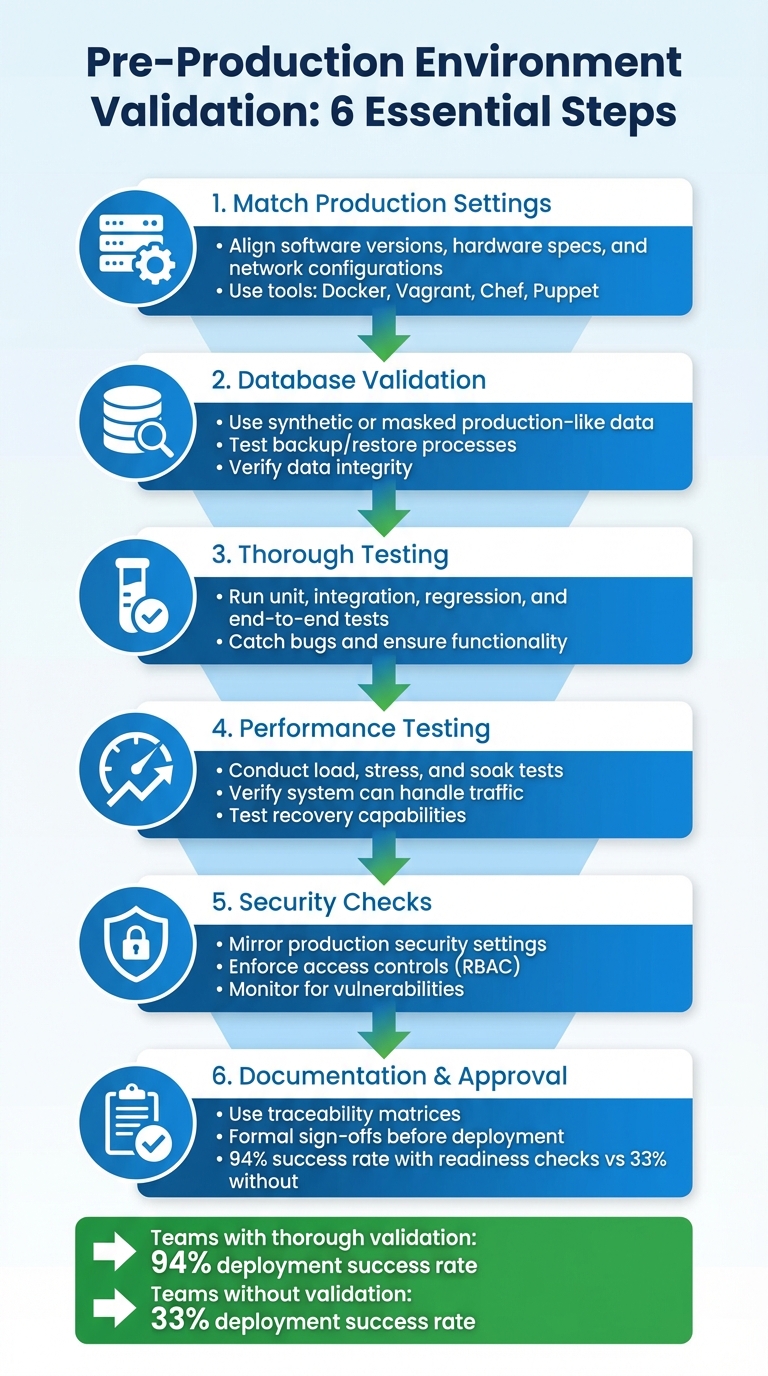
- Match Production Settings: Align software versions, hardware specs, and network configurations to avoid surprises during deployment.
- Database Validation: Use synthetic or masked production-like data and test backup/restore processes to ensure data integrity.
- Thorough Testing: Run unit, integration, regression, and end-to-end tests to catch bugs and ensure functionality.
- Performance Testing: Conduct load, stress, and soak tests to verify your system can handle traffic and recover effectively.
- Security Checks: Mirror production security settings, enforce access controls, and monitor for vulnerabilities.
- Documentation and Approval: Use traceability matrices and formal sign-offs to ensure readiness before deployment.
By following these steps, teams can reduce deployment risks, improve reliability, and ensure a smoother transition to production.
6-Step Pre-Production Environment Validation Checklist
What Is Pre Production In Software Development? - Next LVL Programming
Configuring Pre-Production to Match Production
Making pre-production a close mirror of production is crucial for spotting hidden bugs before they cause trouble. The goal isn't perfection but reducing the differences that could lead to unexpected production issues.
The Twelve-Factor App methodology is clear on this: developers should avoid using different backing services between development and production [5]. Even minor discrepancies - like using SQLite during development while relying on PostgreSQL in production - can lead to deployment headaches. Beyond that, your hardware and software configurations should also align as closely as possible with production.
Replicating Hardware and Software Specs
Your pre-production environment should mirror production’s technology stack down to the smallest detail. If production relies on a specific version of PostgreSQL or uses Memcached for caching, those same configurations should be reflected in pre-production. Teams often cut corners here, swapping services like RabbitMQ for Redis or Nginx for Apache in pre-production, but these mismatches can introduce hidden issues [5]. Tools like Docker, Vagrant, Chef, and Puppet can help ensure an exact replication of production settings.
A practical way to approach this is through staged scaling. Early stages of your pre-production pipeline might use smaller instances to save costs, but the final pre-production setup should match production’s hardware specs. This includes CPU cores, memory, and disk I/O capabilities. Gradually scaling up ensures that your later stages accurately reflect production’s complexity and performance demands [1].
Once the software and hardware are aligned, it’s time to focus on network and API configurations to eliminate operational inconsistencies.
Setting Up Network and API Configuration
Network configuration can be a sneaky source of problems. Instead of static IPs, use DNS hostnames [6]. Relying on static IP addresses can cause startup failures when services cross network boundaries [6].
Your security settings should also be a carbon copy of production. Duplicate firewall rules, load balancer setups, and IAM roles exactly as they are in production. For instance, if your production APIs are behind an internal Application Load Balancer (ALB) within a private subnet, your pre-production environment should be set up the same way. This ensures you catch potential permission issues during inter-service communication.
"Testing your deployment process is as important as testing the changes that result from your deployment." - AWS Well-Architected Framework [4]
Use environment variables to manage legitimate differences, such as API keys, database connection strings, and secrets. These variables should be retrieved securely during deployment [5]. Additionally, make sure pre-production enforces the same rate limits or request throttling as production. This ensures that load testing reflects real-world operational constraints, helping you avoid surprises after deployment.
Validating Database Setup and Data
After ensuring your hardware, software, network, and APIs are all set, it's time to focus on your database. Your database setup should closely resemble production standards. This means using production-like data and maintaining reliable backups to avoid any misleading results.
Database validation is an essential step to ensure your data layer is as ready as the rest of your infrastructure.
Creating Production-Like Test Data
Because production data often contains sensitive information, it's best to create synthetic data that mimics real-world scenarios. Tools like faker.js can help by generating fields that align with your production schema, such as names, emails, and timestamps.
For more complex cases, you can mask actual production data. This involves obfuscating sensitive fields while keeping relationships intact. For example, transaction records should still link to valid (though masked) user and product IDs. According to Gartner, by 2026, 75% of businesses will use generative AI to create synthetic customer data [7].
"The examples through which you seed the generation need to mimic your real-world use case." - Akash Srivastava, Chief Architect, InstructLab [7]
When creating synthetic data, it's crucial to validate it. Use statistical methods like histograms, mean, and variance to ensure the generated data retains the properties of your original production data. Akash Srivastava emphasizes:
"You have to have a human in the loop for verification... always take a few random samples and manually check that they are giving you the kind of data you want" [7]
To reduce resource strain, tools like faker.js and pg_dump with LIMIT clauses can help generate or extract synthetic data efficiently. Once you've confirmed the integrity of this data, you can move on to testing your backup and restore processes.
Testing Backup and Restore Processes
A backup is only as good as its ability to be restored. Regularly test restores in a pre-production environment to ensure data recovery meets your defined Recovery Time Objective (RTO) and Recovery Point Objective (RPO) [8].
"Testing the recovery of the backups verifies that data can be restored when needed without having any worry that data might be missing or corrupted, that the restoration and recovery is possible within the RTO for the workload, and any data loss falls within the RPO for the workload." - AWS Well-Architected Framework [8]
Commands like RESTORE VALIDATE allow you to check backup integrity without affecting your live data. For quicker checks, you can perform schema-only restores to verify database structure without loading all the rows. Cockroach Labs advises frequent schema-only restores to identify credential issues, schema mismatches, and version compatibility [9].
To streamline the process, consider automating restore drills using AWS Lambda or Step Functions. Record the duration of these drills to ensure they meet your RTO requirements, and always query the restored data to confirm that it’s both complete and uncorrupted.
Running Complete Testing Suites
After validating the database, it's critical to run a thorough automated test suite with every commit. This ensures the stability of your pre-production environment and helps catch potential issues early [10].
A solid testing strategy should include multiple layers: unit tests to verify individual functions in isolation, integration tests to ensure components work together correctly with real dependencies, and regression tests to confirm that new code changes don't disrupt existing functionality. Below, we’ll break down these layers and how they contribute to robust testing.
Executing Unit, Integration, and Regression Tests
Unit tests are designed to be quick and efficient, focusing on isolated functions. To achieve this, mock external dependencies like file systems, network calls, or databases. This approach ensures tests remain fast and reliable. When a unit test fails, it clearly identifies the specific function causing the issue.
Integration tests, on the other hand, validate how components interact with actual services. These tests take longer because they involve real-world dependencies such as databases, cloud services, and APIs. AWS Prescriptive Guidance suggests running integration tests with every commit to promptly catch configuration or communication errors [1].
Regression tests are vital for maintaining stability as your code evolves. These automated end-to-end tests replicate real user interactions, ensuring that new changes don’t unintentionally break existing features [12]. To save time, consider running tests in parallel or splitting them into smaller groups (sharding). Use stable selectors, like persistent HTML attributes (data-testid), instead of fragile CSS or XPath selectors, as these are less likely to be affected by UI changes [12].
Testing Functionality and User Interfaces
End-to-end tests should mimic real user workflows without relying on mocks, focusing entirely on visible user behavior. Use stable, role-based selectors like roles or visible text (e.g., page.getByRole('button', { name: 'submit' })) rather than technical selectors to increase test reliability [11][13].
Each test must run independently. This means isolating local storage, session data, and cookies to simplify debugging [13]. For tests involving data changes, start by creating new records rather than modifying existing ones. This keeps the environment clean and avoids unintended side effects [12].
To reduce flaky test results, use web-first assertions that auto-wait for conditions like visibility (e.g., toBeVisible()). Additionally, mock responses from third-party servers using Network APIs to protect your test suite from failures caused by external service outages. This ensures your tests remain stable and reliable, even when external dependencies are unpredictable.
sbb-itb-c336128
Running Performance and Load Tests
Performance and load tests are essential for validating how your application performs under real-world and extreme conditions before it goes live. These tests simulate production scenarios, pushing your system to its limits to ensure it can handle traffic without breaking down. Load testing focuses on how your system performs under normal peak usage, while stress testing goes beyond that, identifying the breaking point of your application [15][19]. Together, they help confirm your pre-production environment is ready for real-world traffic.
For example, load testing might evaluate how well your system handles 1,000 or even 10,000 simultaneous API requests while maintaining acceptable response times. Stress testing, on the other hand, deliberately overloads the system to expose vulnerabilities and pinpoint exactly where failures occur. Another important test, soak testing (or endurance testing), sustains high traffic levels for extended periods - typically 6 to 24 hours - to identify issues like memory leaks or gradual resource degradation [15][18]. Each test type plays a unique role in preparing your application for production.
Simulating Real Traffic Patterns
To get accurate test results, your pre-production environment should closely replicate your production setup, including hardware, network configurations, and data volumes [3][15]. If creating a full replica is too expensive, you can adjust your test results to account for resource differences. For instance, if your staging environment has only 60% of the resources of production, you can extrapolate how production might behave under similar conditions [17].
Distributed cloud testing is key to simulating real-world usage. Running tests from a single developer machine or CI/CD node won’t accurately reflect how your system handles horizontal scaling. Tools like Artillery, JMeter, and k6 allow you to generate load from multiple cloud instances, mimicking real users accessing your application from various locations and network conditions [18][22]. For instance, Artillery enables you to define test scenarios in YAML and scale them across distributed nodes, providing a more realistic simulation of user behavior.
In addition to load testing, consider using synthetic monitoring (STM). Unlike Real User Monitoring (RUM), which tracks actual users, STM uses automated scripts to simulate user interactions at specific times, such as during peak traffic hours [14][16]. This proactive approach helps you identify potential issues before they impact real users. With distributed testing and virtualization in place, you can focus on identifying your system's performance thresholds methodically.
Stress Testing and Performance Benchmarking
Stress testing builds on realistic load simulations to uncover system weaknesses. A common approach is to gradually increase the load in stepped increments - for example, adding 100 virtual users every 5 minutes - until the system reaches a performance threshold or error rate [20][21]. This method helps you understand whether your application scales smoothly or hits a hard limit.
During stress tests, monitor key metrics like CPU, memory, disk, and network usage. These resources are interconnected, so a shortage in one area can cascade into others. For example, if memory usage drops below 10%, it can trigger paging, causing spikes in CPU and disk activity that degrade performance [19]. Similarly, a sustained disk queue length above 2 indicates a bottleneck [19]. Tools like New Relic or Datadog can provide detailed insights, tracing individual transactions to identify code-level issues [15][16].
One important tip: change only one variable at a time between test runs. For example, if you adjust database connection pooling and increase server instances simultaneously, it will be impossible to determine which change affected performance [19]. Automating success criteria with plugins like Artillery's "ensure" or using Apdex scoring can streamline your testing process by setting clear pass/fail conditions, eliminating the need for manual report reviews [18]. Don’t forget to test recovery by gradually reducing the load after pushing the system to its limits [22].
| Test Type | Duration | Primary Use Case |
|---|---|---|
| Load Testing | 15–60 minutes | Validates performance under expected peak traffic [15] |
| Stress Testing | Until failure | Identifies breaking points and recovery ability [15] |
| Spike Testing | <30 minutes | Tests autoscaling during sudden traffic bursts [18] |
| Soak Testing | 6–24 hours | Uncovers memory leaks and resource issues [15][18] |
Monitoring Performance and Security
After conducting thorough performance and load testing, the next step is to keep an eye on system stability and security in a pre-production environment. This stage is all about catching potential issues early by tracking resource usage, monitoring error trends, and ensuring access controls are functioning as they should.
Tracking Resource Usage and Error Rates
Start by establishing baselines for key metrics like CPU, memory, disk I/O, and network bandwidth under normal load conditions in the pre-production environment[15]. These baselines act as benchmarks - any significant deviation could indicate a problem.
To track these metrics, deploy monitoring agents such as Prometheus or Telegraf, which can send data to platforms like Grafana or DataDog for centralized analysis[23]. For a deeper understanding of how your application handles transactions and where bottlenecks might occur, you can instrument your code using OpenTelemetry or tools like Application Insights[23]. Don’t forget about your database - use extensions like pg_stat_statements to identify slow or resource-heavy queries during this stage[2]. Define clear acceptance thresholds for critical metrics; for instance, aim for response times of 2 seconds or less to meet user expectations[15].
Set up automated alerts to notify your team when metrics stray too far from the baseline. For example, if CPU usage spikes alongside an increase in error rates, this could signal an emerging issue[15]. Conduct stepped load tests to gradually increase traffic, creating data points that help identify the exact load threshold where performance begins to degrade[28].
Once your system’s resource usage is under control, you can shift focus to reinforcing security measures.
Verifying Access Controls and Security Policies
Security protocols in pre-production should mirror those in production. Maintaining this parity ensures smoother deployments and easier debugging[24]. As part of this process, implement Role-Based Access Control (RBAC) to limit access strictly to those who need it[27].
Each environment should use unique access tokens to ensure that a breach in pre-production doesn’t compromise production systems[24]. Centralized identity management through Identity-Aware Proxies (IAP) can enhance security by verifying user identities and enforcing context-sensitive access rules, offering an alternative to traditional VPNs[24]. Additionally, enable system auditing to log user actions and connection events, creating a trail for forensic analysis in case of incidents[27].
To further safeguard your network, deploy Web Application Firewalls (WAFs) and monitor logs for potential threats like SQL injection or cross-site scripting attacks[24]. Follow the ISO 27002:2022 standard, particularly control A.8.31, which emphasizes separating development, testing, and production environments to avoid cross-contamination[26].
Michael Czapinski, Principal Engineer at Google’s Infrastructure SRE, encapsulates the importance of these efforts:
"We meticulously protect, monitor, and maintain these foundational services at all costs... prioritizing security and reliability even at the expense of additional costs and inefficiencies"[25].
Documenting Validation and Approval
Once you've completed thorough configuration, testing, and performance checks, it's time to document the results. This step ensures a smooth transition to production. Research highlights that insufficient testing causes 34% of deployment failures, while 28% are linked to database migration issues, and 18% result from configuration drift[31]. These problems often arise due to gaps in documentation and accountability.
Building Traceability Matrices
To ensure every feature and service is accounted for, create traceability matrices. Use centralized scorecards that integrate with your CI/CD pipeline, observability tools, and security systems. This approach ensures no aspect of your validation process is overlooked[30][32]. According to Cortex, 98% of engineering leaders have faced major issues from launching unprepared services, and 66% cite inconsistent standards across teams as a key barrier to production readiness[32].
Your matrix should cover validation outcomes in four main areas:
- Security: Secrets management and dependency scans.
- Observability: Logging and monitoring dashboards.
- Reliability: SLO definitions and failover testing.
- Infrastructure: Environment variables and SSL certificates[32].
When gaps are identified, document them as critical tasks with deadlines and remediation plans. This keeps the process accountable while avoiding unnecessary delays[32]. Once all components are mapped, secure formal approval to move forward with deployment.
Getting Formal Sign-Off for Deployment
Formal approval converts the validation process into a clear go/no-go deployment decision. A gate-based system ensures changes can only advance when all validations are successfully completed[29]. A standardized readiness assessment, such as a 47-point checklist, provides an objective score to guide decisions. Teams scoring 40 or higher achieve a 94% deployment success rate, while scores below 30 face a 67% failure rate[31].
Conduct this readiness assessment 48 hours before the planned production launch to uncover any critical issues[31]. Then, two hours before deployment, assemble key stakeholders to verify monitoring dashboards and finalize the sign-off[31].
Establish rollback criteria ahead of the deployment window to avoid making decisions during a crisis. As Stephen Watts from Splunk advises:
"A solid incident response plan is the difference between a mere hiccup and a total disaster"[30].
Your sign-off documentation should include test evidence, runbooks for operational tasks, and a clear record of who authorized the release. AWS DevOps Guidance underscores the importance of this process:
"Each non-production deployment serves as a gate, only allowing changes to progress to the next stage after they pass all validations"[29].
Conclusion
Validating your pre-production environment isn't just a checkbox - it’s the line between a smooth deployment and a potential disaster. By aligning configurations with production, verifying deployment steps, and ensuring security measures are in place, you can spot and resolve issues that often lead to deployment failures or database migration problems[31].
As the AWS Well-Architected Framework emphasizes:
"Testing your deployment process is as important as testing the changes that result from your deployment" [4].
A thorough pre-production validation process equips your team to deploy confidently, minimizing the need for last-minute fixes. By rigorously testing resilience patterns, performance metrics, and security protocols in realistic scenarios, you can ensure stability. Combining load testing with automated regression suites helps safeguard against new features disrupting existing functionality[4].
To make this process more efficient, technology can play a key role. Automation is a game-changer here. Tools like Infrastructure as Code (IaC) enable consistent and reliable test environments, while AI-powered solutions like ClackyAI (https://clacky.ai) take validation to the next level. ClackyAI’s diagnostics can identify and address errors automatically, turning what was once a bottleneck into a seamless and continuous process.
Skipping these essential validation steps can jeopardize deployment success. Teams that perform thorough readiness checks enjoy a 94% success rate - far surpassing the 33% success rate of those who don’t[31].
FAQs
Why is it critical to mirror production settings in pre-production environments?
To thoroughly test your application, it's crucial to replicate production settings in pre-production environments. Doing so helps uncover configuration problems, performance bottlenecks, or dependency issues before they can affect the live system.
When you simulate actual operating conditions, you gain a clear understanding of how your application will function once deployed. This practice not only cuts down on surprises but also reduces potential downtime, ensuring a smoother experience for your users.
How can synthetic data help validate databases in pre-production?
Synthetic data offers a smart way to validate databases in pre-production settings. By generating datasets that mirror the structure and statistical traits of real data, you can safely test database configurations, schemas, and performance without risking exposure of sensitive information.
For synthetic data to be effective, it needs to closely match the distributions and patterns found in real-world data. Tools like Faker.js or database-specific features can assist in creating realistic datasets tailored for testing. To ensure reliability, compare your synthetic data to actual production data to confirm it accurately represents real-world scenarios. This method helps catch potential issues early, minimizes risks, and ensures your database is ready for deployment.
Why are load and stress tests important in pre-production environments?
Running load and stress tests in pre-production plays a key role in preparing your system to handle real-world demands. These tests allow you to assess your system's capacity, pinpoint bottlenecks, and confirm that your application can manage both normal and peak traffic without breaking a sweat.
By uncovering potential issues before launch, you can boost reliability, provide a smoother user experience, and steer clear of expensive downtime or failures once in production. This step is crucial for delivering an application that’s ready to scale and perform under pressure.